

Many people are curious about how to use the Binance API. In this article, we will find out how to use the Binance API, including how to issue the Binance API key and how to withdraw funds using the Binance API.
What is the Binance API?
API stands for Application Programming Interface, and it is a programming interface provided by Binance.

By writing programming code using Binance Python, you can implement features such as real-time auto trading, deposits, and withdrawals.
How to Use Binance API
First, sign up for Binance. If you sign up using the link below, we will show you how to trade with free limit orders and a 60% discount on market orders.
💰 Binance Taker Fee Free, 60% Market Fee Discount MethodHow to Issue Binance API Key
1. Access the Binance site and log in.
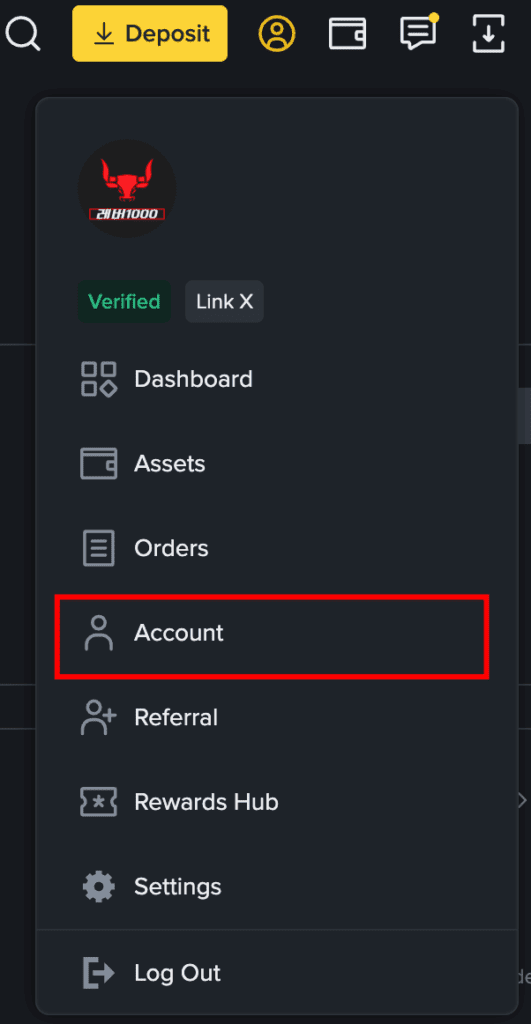
2. Click the person icon on the top right, then click Account in the bottom menu.
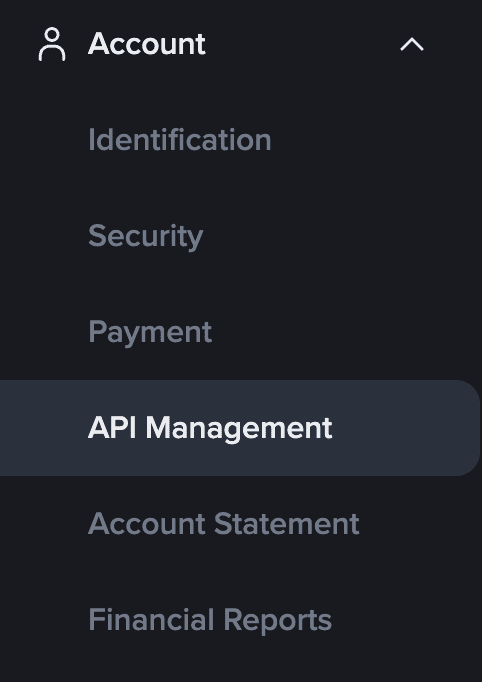
3. Once inside, you will see API Management below Account in the left menu. Click it.
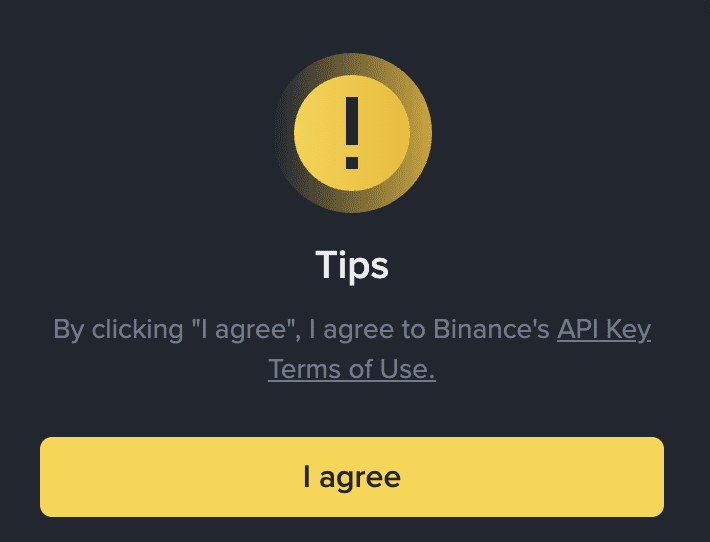
4. A warning window will pop up with information about the Binance API. Click on API key Terms of Use to read it once. Click I agree.
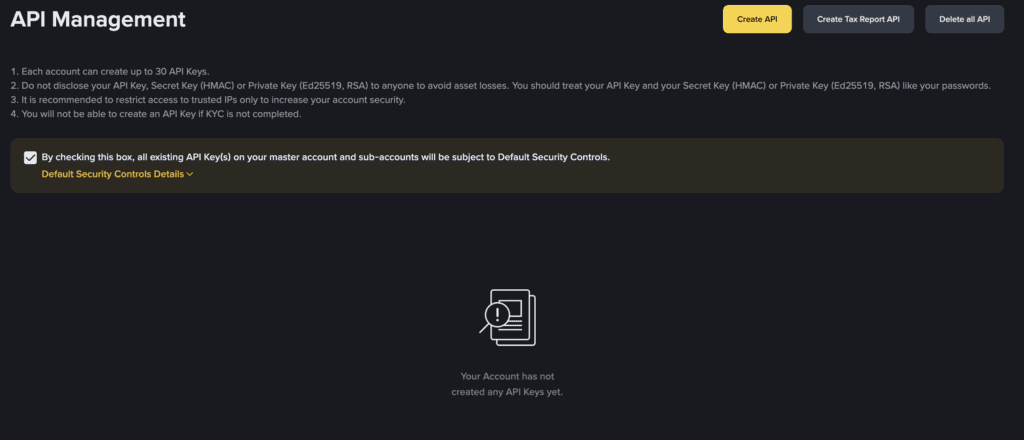
5. Click Create API on the top right.
The text in the image above translates as follows:
API Management
- Each account can create a maximum of 30 API keys. 30개의 API 키를 생성할 수 있습니다.
- API Key, Secret Key (HMAC), Private Key (Ed25519, RSA) should never be shared with others. It may lead to asset loss.
- It is recommended to restrict access only to trusted IP addresses.을 권장합니다.
- You cannot create an API Key without completing KYC (Identity Verification). 을 완료하지 않으면 API Key를 생성할 수 없습니다.
Checkbox text: If you select this box, all existing API Keys of the master account and sub-accounts will be subject to Default Security Controls.
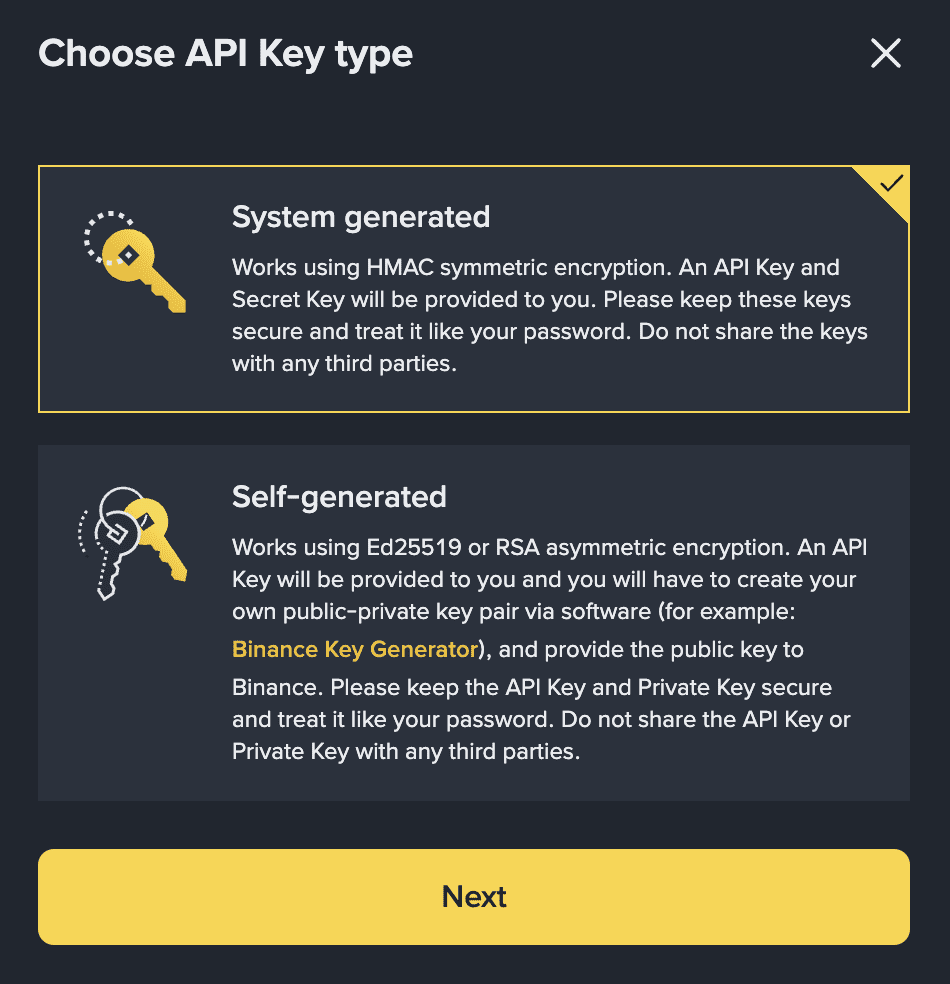
6. You need to choose the API key type. For first-time users, select the System generated method.
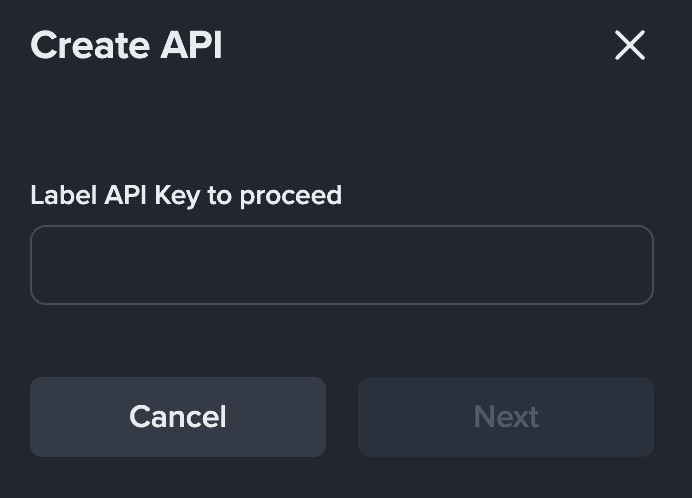
7. Enter the desired API name.
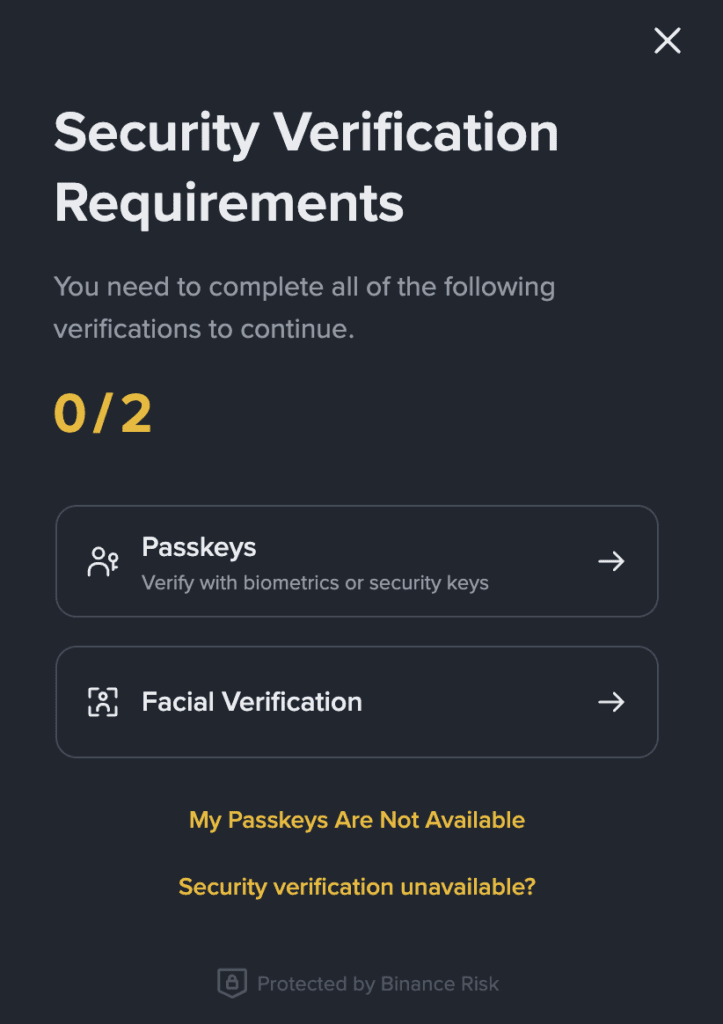
8. Proceed with the Security Verification process. You must complete Passkey and facial verification.
9. Copy and paste the API key and Secret Key. Be especially careful to save the Secret Key, as it will not be displayed after your initial access.
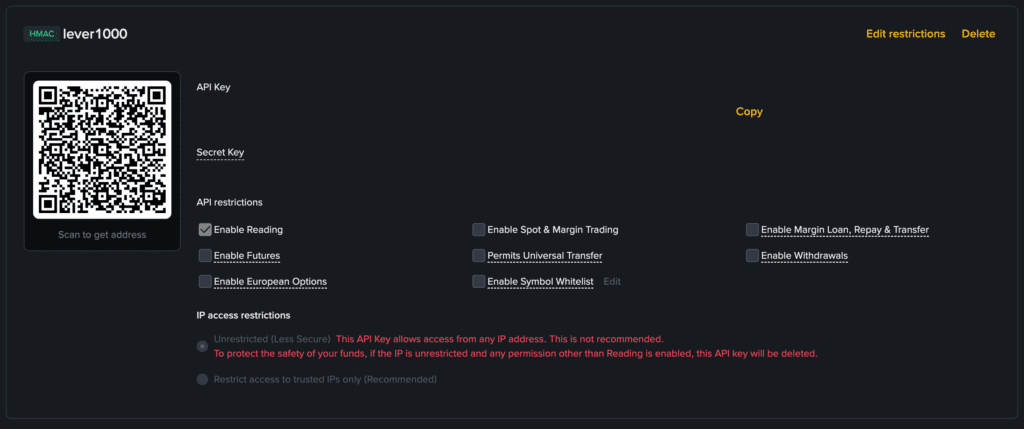
10 Set the API permissions. The details of the items marked in the image above are as follows:
API Key Information
- HMAC lever1000
This is an API key generated with the HMAC method, and its name (label) is 'lever1000'. - QR Code
Used when connecting to this API key address by scanning it with an external app or bot. - API Key / Secret Key
Authentication keys used by the trading program to access the exchange account.
Must never be shared with others asset theft can occur if exposed.
API Restrictions
The functions currently allowed for this API key.
- Enable Reading (Activated) : Can view (Read) account information or trading history. 조회(Read) 할 수 있음.
- Enable Spot & Margin Trading Can execute Spot and Margin trading functions via API.
- Enable Futures Allows Futures trading.
- Enable Margin Loan, Repay & Transfer Allows Margin loans, repayment, and fund transfers.
- Enable European Options Allows European Options trading.
- Permits Universal Transfer Allows fund transfer between wallets.
- Enable Withdrawals Allows the withdrawal function (Generally disabled as it is the most dangerous).
- Enable Symbol Whitelist Sets a whitelist that only allows specific symbols.
In the current screen, only Enable Readingis checked, meaning this API key is created as Read-only (the safest state).
IP Access Restrictions
- Unrestricted (Less Secure)
Currently, this API key is accessible from all IP addresses. 모든 IP 주소에서 접근이 가능한 상태입니다.
The security warning is displayed in red because this setting is not recommended.입니다. - Restrict access to trusted IPs only (Recommended)
An option to restrict access only to specific IP addresses.
It is generally recommended to enable this setting for security.
Warning Message: "This API key is accessible from any IP. This is not recommended. For the safety of your funds, if there are no IP restrictions and permissions other than Read are allowed, this API key may be deleted."
The API issuance is now complete. You can now use it as you wish.
Binance API Auto Trading Method
The necessary preparations for Binance auto trading are as follows:
- Binance API
- Auto Trading Bot Program
Preferred programs differ for each individual, but I recommend TradingHook.
- TradingView Pine Script
This can be seen as the strategy that determines the criteria for implementing auto trading. Strategies with higher prices often had better returns. However, this is not always the case. But strategies with higher prices often have more capital invested or have been used by many people before.
- Cloud (Linux)
you can refer to the following for Binance Futures auto trading code:
Futures Historical Data Code
with open("../account.txt") as f:
    lines = f.readlines()
    api_key = lines[0].strip()
    api_secret = lines[1].strip()


from binance.client import Client
client = Client(api_key=api_key, api_secret=api_secret)
data = client.futures_historical_klines(
    symbol="BTCUSDT",
    interval='1d',
    start_str='2021-01-01',
    end_str="2021-11-26"
)
print(data)
Futures Current Price Code
with open("../account.txt") as f:
    lines = f.readlines()
    api_key = lines[0].strip()
    api_secret = lines[1].strip()


from binance.client import Client
client = Client(api_key=api_key, api_secret=api_secret)
price = client.futures_symbol_ticker(symbol="BTCUSDT")
print(price)
Futures Order Book Code
with open("../account.txt") as f:
    lines = f.readlines()
    api_key = lines[0].strip()
    api_secret = lines[1].strip()


from binance.client import Client
client = Client(api_key=api_key, api_secret=api_secret)
orderbook = client.futures_order_book(symbol='BTCUSDT')
print(orderbook.keys())
Futures Order Code
with open("../account.txt") as f:
    lines = f.readlines()
    api_key = lines[0].strip()
    api_secret = lines[1].strip()


from binance.client import Client
client = Client(api_key=api_key, api_secret=api_secret)
order = client.futures_create_order(
    symbol="XRPUSDT",
    type="LIMIT",
    timeInForce='GTC',
    price=0.85,
    side='BUY',
    quantity=10
)
print(order)
How to Withdraw Funds Using Binance API
Binance API Withdrawal Code
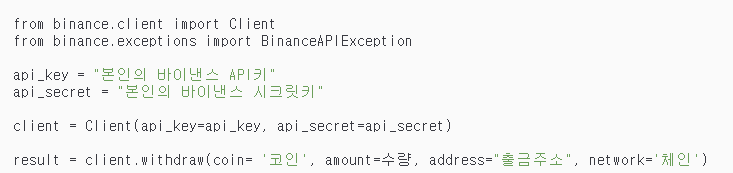
The Binance API withdrawal code is as follows:
from binance.client import Client
from binance.exceptions import BinanceAPIException

api_key = "본인의 바이낸스 API키"
api_secret = "본인의 바이낸스 시크릿키"

client = Client(api_key=api_key, api_secret=api_secret)

result = client.withdraw(coin= '코인', amount=수량, address="출금주소", network='체인')

#ex)result = client.withdraw(coin= 'USDT', amount=100, address="출금주소", network='BSC')
First, download the Binance Python module in the terminal as shown below.
pip install python-binanceLooking at the code, it first imports the Binance module.
from binance.client import Client
from binance.exceptions import BinanceAPIException

api_key = "본인의 바이낸스 API키"
api_secret = "본인의 바이낸스 시크릿키"
Then, it declares the api_key and api_secret variables to store your Binance API key and Secret Key.
Be careful, as the Secret Key cannot be retrieved after the initial issuance. Next, it configures the client function to link your API key and Secret Key.
client = Client(api_key=api_key, api_secret=api_secret)

result = client.withdraw(coin= '코인', amount=수량, address="출금주소", network='체인')
The withdraw function, which handles withdrawals, includes information such as the type and quantity of the coin to be withdrawn, the withdrawal address, and the withdrawal chain.
For the chain, you would input it in the format Ethereum - ETH, Arbitrum - ARB, Tron - TRX, which completes the withdrawal code.
API Examples (2024 Version)
Code to Output Current KRW Balance
import ccxt

with open("key/bithumb_key.txt") as f:
    lines = f.readlines()
    connect_key = lines[0].strip()
    secret_key = lines[1].strip()

exchange = ccxt.bithumb(config={
    'apiKey': connect_key,
    'secret': secret_key,
    'enableRateLimit': True
    }
)

# balance
balance = exchange.fetch_balance()
krw_balance = balance['KRW']
print(krw_balance['total'])
Binance API Key – Account Access Code
import os
from binance.client import Client

api_key = os.getenv('Binan_API_KEY')
api_secret = os.getenv('Binan_SECRET_KEY')

client = Client(api_key, api_secret)

# Get asset balance
balance = client.get_asset_balance(asset='XRP')
print('XRP balance :', balance)
Binance Futures Buy and Sell Example Code
def order(symbol, side, quantity)-> int:
now = rq.get('https://api.binance.com/api/v3/time').json()['serverTime'] # 현재 시점
if quantity >= 10:
quantity = str(int(quantity))
else:
quantity = str(quantity)
quantity = quantity[:5]
if quantity.endswith('.'):
quantity = quantity[:-1]
if side == 1:
side = 'BUY'
else:
side = 'SELL'
message = f'symbol={symbol}&side={side}&type=MARKET&quantity={quantity}×tamp={now}'
signature = hmac.new(key=SECRET_KEY.encode('utf-8'), msg=message.encode('utf-8'),
digestmod=hashlib.sha256).hexdigest()
url = f'{URL}/fapi/v1/order?{message}&signature={signature}'
result = rq.post(url, headers = headers)
return result.status_code
symbol = 'IOTAUSDT'
side = 'SELL' # or BUY
quantity = 20
status_code = order(symbol, side, quantity)
print(status_code)Binance Auto Trading Review
If you are curious about trading reviews, please refer to the article below.
Binance Auto Trading Review Recently, many people have been making decent profits by trading with bots created using the built-in features on Binance, without such complex processes. I will post about this later.
Binance Usage Guide
We have gathered all the previously compiled exchange usage guides and Q&A into a roadmap for easy viewing. Please bookmark and use it.
[Check Crypto Exchange Usage Guide]